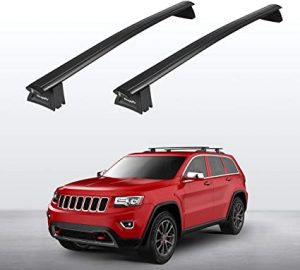
Roof racks serve a great purpose to carry luggage with ease during a road trip in your car. The best part about a quality roof rack is easier installation and quick removal. Yakima roof rack offers the same with their high-quality frames of racks that are quick to install and easy to remove. However, certain models might be tricky and they may end up taking time. If you have a Yakima roof rack installed by an expert and now you want to remove it, then there is a simple procedure. To begin, you need some tools and the right guidance. Start by checking the model of your Yakima roof rack and then let’s follow the given steps –
Table of Contents
4 Steps To Remove The Yakima Roof Rack

Step 1 – Remove the Cover from the baseline
The baseline of the roof rack is installed to the sides of your car and it is the key component that holds the rack. There is a total of four baselines on the sides of your car. First of all, remove the cover from the baseline, which hides all the screws inside. It is a plastic cover and you can remove it with a prying tool. There is a security tab that you must remove after removing the cover. You can hear a click sound as it unlocks. There are a total of four security tabs so pull them all.
Step 2 – Remove the Seat and Adapter
There is a small component called a seat that unlocks when you remove the security tab. Remove the small seat component and remove the adapter after that. The concave side of the crossbar will be open and you have to give a little push to remove it from the column. Once you do it on one side, the other side also unlocks. Make sure to have someone for help to hold the crossbar, otherwise, it might scratch.
Step 3 – Remove Crossbar
Two crossbars start falling once you unlock from one side. Once the crossbar is removed, you have baseline adapters only. These are slightly tricky to remove until you get a clear view from a little height. So, get yourself a small chair and stand on it to take a clear view. It is time to remove the crossbar baselines by unscrewing the bolt and everything is done. Now, you have the crossbar with you and it can be stored safely.
Step 4 – Clean the residue
Dust and dirt start collecting near the baseline area and it is essential to clean. You can use soapy water and give it a gentle clean with a wet soapy towel. You have successfully removed the Yakima roof rack by this method. In most models of Yakima roof racks, the procedure is almost the same.
Bottom Line
By following all the given steps, you can remove the roof rack. But, if you are having any complications due to the different parts, make sure that you refer to the instruction manual from the manufacturer.
Read Following For More Vehicle Racks…